
Feeding birds brings so much joy to our lives. Watching a bright red cardinal or a tiny goldfinch visit your yard feels like a small gift from nature. However, your favorite hobby comes with a big responsibility. When we hang feeders, we bring many birds together in one small spot. In the wild, birds spread out, but feeders concentrate them. This setup creates a breeding ground for nasty diseases, fuzzy mold, and unwanted pests. Old, wet seeds can rot quickly, making your feathered friends very sick.
Keeping things tidy is the best way to show you care. A sparkling clean feeder means healthier birds, fewer squirrels or rats, and equipment that lasts for years. This guide is for everyone—whether you just bought your first plastic tube or you manage a dozen stations for your whole neighborhood. I promise to show you a simple step-by-step path. You will learn the best cleaning schedules, safe bleach alternatives, and how to fix common messes. Let’s keep those wings flapping and those songs singing!
Quick Summary
If you are in a rush, follow this quick action checklist to get the job done right now:
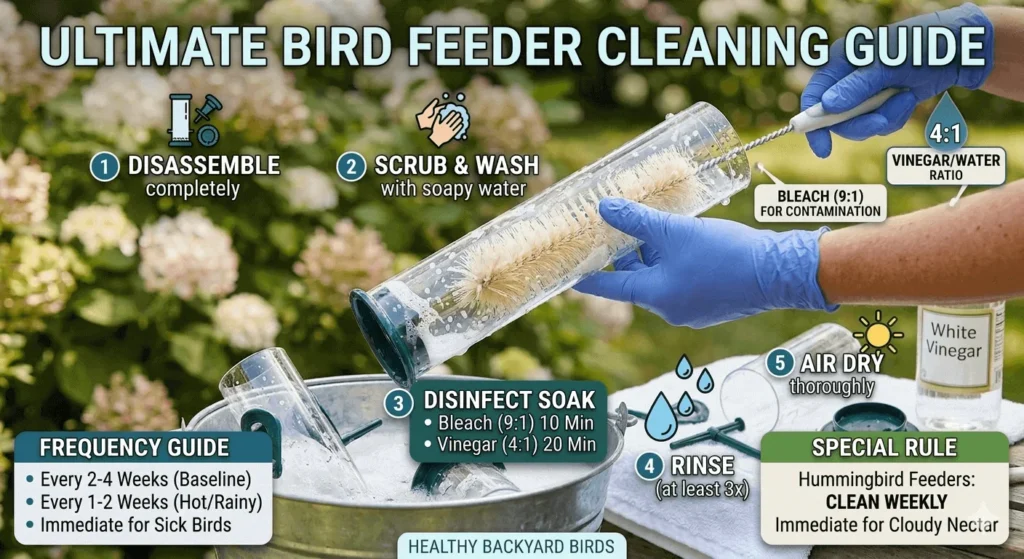
- Take it apart: Disassemble every piece.
- Dump the junk: Discard all old or wet seeds.
- Scrub hard: Use hot soapy water or a 9:1 water-to-bleach mix.
- Rinse well: Wash it at least three times.
- Dry out: Let it air dry completely in the sun.
- Fill up: Add fresh seed and hang it back up.
Important Rule: Clean hummingbird feeders every single week without fail!
What You’ll Need
Gathering the right tools makes this job incredibly easy. I keep a dedicated cleaning bucket in my garage just for this chore.
Essential Supplies Checklist
- Sturdy nitrile gloves
- Clean bucket
- Mild, unscented dish soap
- Bleach (for a 9:1 water-to-bleach mix) or white vinegar (for a 4:1 water-to-vinegar mix)
- Clean, dry towels
- Gentle scrub pads
Specific Tools By Feeder Type
Different styles need different brushes.
- Tube designs: Grab a long, flexible bottle brush.
- Tiny ports: Keep an old, clean toothbrush handy.
- Hummingbird nozzles: You will absolutely need a tiny funnel and a thin pipe cleaner.
- Suet cages: A stiff wire brush works magic on stuck-on grease.
Safety Gear & Replacement Checks
Always wear eye protection and gloves. Furthermore, work in a well-ventilated area outdoors. While you wash, look closely for obvious wear signs. Throw away items with severely cracked ports, heavily frayed rubber seals, or dangerous, sharp rust spots.
When to Replace Parts
Stay safe by checking for wear and tear. Look for cracked plastic ports, frayed seals, or rusty wires. If a part looks broken or sharp, it is time to buy a replacement.
When and How Often to Clean
How often should you scrub? It depends on the weather and how many guests visit your yard.
- Standard Rule: Clean most feeders every 2 to 4 weeks.
- Sticky Weather: If it is hot, humid, or raining a lot, clean every 1 to 2 weeks.
- Hummingbird Feeders: These need a wash every week. Clean them immediately if the sugar water looks cloudy or if you see ants.
- Emergency Cleaning: If you see a sick bird or notice bird droppings on the feeding tray, stop everything and clean it right away.
Check for visible mold, clumpy seeds, or a sour smell. If you see these signs, grab your bucket!
Step-by-Step Cleaning Process
Follow these steps to ensure your backyard stays a safe haven.
Disassemble Completely
Take everything apart. Remove the perches, the plastic trays, and the little decorative caps. Check the tiny spots where seeds get stuck.
Discard Old Seed Safely
Dump all leftover seeds into a trash bag. Do not put them in your compost pile. Moldy seeds carry diseases that can survive in compost and harm other wildlife.
Wash & Scrub
You have two choices here. If your feeder is dishwasher-safe, you can toss it in there on a hot setting. Otherwise, hand-wash it. Use warm, soapy water and your brushes to reach every corner. For tough germs, soak the parts in a 9:1 water-to-bleach mix for 10 minutes.
Vinegar Alternative
If you prefer to avoid chemicals, use 4 parts water and 1 part white vinegar. Let the parts soak for 20 minutes to break down the grime. This is a great choice for A Pet Care Guide approach to backyard safety.
Rinsing Protocol
Rinse every piece at least three times. You must get rid of all soap or bleach. Do a “sniff test”—if you still smell bleach, rinse it again.
Drying and Sun Exposure
Let the parts sit in the bright sun. Sunlight acts as a natural disinfectant. Never put a feeder back together while it is still damp, as moisture traps mold.
Reassemble & Refill
Put the pieces back together. Check that the seals are tight. Refill with high-quality, dry seeds and find a good spot to hang it.
Deep Cleaning & Problem-Specific Fixes
Sometimes you face bigger messes. If you see black mold, soak the feeder in a stronger solution and scrub until every speck is gone. If the tiny holes on a nectar feeder get clogged, use a pipe cleaner or a thin wire to poke them clear. Just be careful not to make the holes bigger.
To stop ants, use an “ant moat” filled with water. For squirrels, check your baffles and replace any parts they chewed on. If your metal feeders show rust, use a bit of steel wool to sand it off. If the rust is deep, it is safer to buy a new one.
Preventative Maintenance & Best Practices
Smart habits keep your birds coming back. Place your feeders away from windows to prevent crashes and keep them clear of bushes where cats hide.
- Ground Care: Rake up the shells and spilled seeds under your feeder every few days. This stops rodents from moving in.
- Rotation: Move your feeder to a new spot in the yard every few months to prevent waste buildup on the grass.
- Storage: Keep your extra seed in a dry, sealed metal bin. Use the oldest seed first.
- Spread Out: Use a few different feeders so birds don’t have to crowd together.
Seasonal Care
Mother Nature constantly changes the rules.
- Summer: Searing heat cooks nectar fast. Increase your washing frequency dramatically. Watch out for rapid nectar spoilage.
- Fall: Look closely for messy leftover molting feathers. Prep your heavy-duty winter gear.
- Winter: Stop serving mixes that hold lots of moisture. Switch to weather-proof, sheltered designs. Watch hummingbird nectar closely to stop it from freezing solid.
- Rainy/monsoon: Attach a wide plastic roof or umbrella baffle above the ports. Sanitize the trays much more often to fight dampness.
Safety & Environmental Considerations
Keep your family, pets, and local wildlife secure.
- Bleach safety: Always measure your dilution accurately. Never mix bleach with any ammonia products, because that creates deadly toxic gas. Work outside.
- Pet and child safety: Rinse every item heavily. Lock all your buckets and cleaning supplies on a high garage shelf away from curious toddlers and dogs.
- Environmental alternatives: Vinegar breaks down naturally and smells better than harsh bleach, though it takes longer to kill bacteria. Look for biodegradable, earth-friendly dish soaps.
- Local wildlife considerations: Never spray chemical pesticides, bug sprays, or rat poisons anywhere near the feeding zones.
Troubleshooting
Birds stopped visiting! Don’t worry. Sometimes birds are shy after you change things. Scatter a handful of seed on the ground nearby to show them the “restaurant” is open again.
It still smells bad. If a scrub didn’t work, let the feeder sit in the direct sun for a full day. The UV rays help kill odors. Leaks everywhere. Check the rubber gaskets on your nectar feeders. If they are dry or cracked, a little bit of food-grade silicone or a new seal will fix the drip.